Hi
Today (it's Halloween!), And I''m going to do my favourites for the month of October.
1. Loreal infallible brush foundation £12.99
I think this is always going to be in my monthly favourites! My favourite foundation.
2. Body Collection maxi-lip lipstick in Melba £0.99
A great lipstick I just recently bought. It's a nice nude peach and great for everyday.
3. MUA mascara in shade 5 £1
I use this basically everyday to shape me eyebrows.
4. Avon true colour tiger eyes palette limited edition (available on ebay)
A great neautral, everyday palette.
5.Natural Collection Water guard mascara £1.99
Great mascara you can rely on to last all day.
Monday, 31 October 2011
Saturday, 29 October 2011
New Pages
Hi
Today I'm just going to briefly tell you about the new pages I created.
The first one is a All About MAC page. I'm not really a expert on this brand, however I found some information about it's setup and thought I should make a page about it.
The second one is a All About MUA page. I do have quite a lot of experince with MUA and own a fair few of there products. I thought I should do a MUA page, as they are my favourite make-up brand.
I hope the pages I created helped you learn a bit more about about MAC and MUA.
Friday, 28 October 2011
More Tips/ Tricks!
Hi
Today I'm going to share with you some great tips/ tricks. It's been a while since I did my last post like this so here we go!
Always use a eyelid primer before applying your eyeshadows. This will make the colour last longer and look more intense. If you don't own a proper eyelid primer you can use any stick concealer you own as one. Or you could even use a liquid concealer if you want, like: Natural Collection CoverUp Cream.
When are you planning on moisturising? Make it after you have a shower or bath. Then your skin will be smoother and softer.
When filling in your eyebrows, use powder to create a more natural look. However pencil does last longer.
If you've ran out of eyeshadow don't worry! Instead just apply a bit of blush or bronzer! As well even if you do have eyeshadow but you love the colour of your blush, you can still use it on your eyes. This can also work the other way around! I love using the MUA shade 16 eyeshadow as a blush!
Hope These Tips Helped!
Wednesday, 26 October 2011
Colours For Your Season
 Hi
HiToday I'm going to share with you colours you should wear depending on your season.
Winters should wear colours that are sharp, stark and clear. White, black, navy blue, red and shocking pink all go well with winter complexions. For lighter colours, wear icy tones rather than pastels. Avoid subdued tones like beige, orange and gold.


Summers should choose pastels and soft neutrals with rose and blue undertones. Lavender, plum, rose-brown and soft blue suit summers well while black and orange do not.
 Autumns should select colours with golden undertones, like camel, beige, orange, gold and dark brown. Avoid colours with blue tones, like navy.
 Springs can wear warm colours like camel, peach, golden yellow and golden brown. Avoid dark, dull colours.
Now You should know what colours you shouls wear.
Different Seasons For Different Skin Tones
Hi
Today I'm going to share with you how to descover what season represents your skin tone.
Winter
These complexions have blue or pink undertones. Skin can be pale white, yellowish-olive, or dark. Winter people are generally brunettes, with deeply colored eyes.
Summer
These complexions, like winter complexions, have blue or pink undertones. Skin is pale and pink. Summers are often natural blondes or brunettes with pale eyes.
Autumn
Autumn complexions have golden undertones. Many redheads and brunettes with golden brown eyes fall into this category.
Spring
Spring complexions have golden undertones and are usually creamy white or peach. Spring people generally have straw-colored or strawberry red hair, freckles, rosy cheeks, and blue or green eyes.
I will soon do a post on what colour soot which season.
Autumn Browns Eye Look
Hi
Today I'm going to help you create this beautiful autumn eye look.
 Start by priming your eyelids with a primer, such as: Urban Decay primer potion.
Next apply a light matte colour all over your lid and up to your eyebrow.
Then apply a shimmery gold champagne colour all over the eyelid.
Now with a large fluffy brush apply a matte dark brow in the crease. At the end create a wing then blend the colours.
On the lid apply a medium thick line of black eyeliner.
Finally coat your lashes evenly in a lengthening mascara.
Now Your Done!
Today I'm going to help you create this beautiful autumn eye look.
Next apply a light matte colour all over your lid and up to your eyebrow.
Then apply a shimmery gold champagne colour all over the eyelid.
Now with a large fluffy brush apply a matte dark brow in the crease. At the end create a wing then blend the colours.
On the lid apply a medium thick line of black eyeliner.
Finally coat your lashes evenly in a lengthening mascara.
Now Your Done!
Monday, 24 October 2011
Video Tutorial Of The Month
This month the Video Tutorial isn't a tutorial. It is a slideshow of MAC pictures. I hope you enjoy.
Also I will only be posting twice a week now.
Wednesday, 19 October 2011
The Latest Look: Winged Eyeliner


The Latest Look: Winged Eyeliner
To create this look you simply line your upper lash line, then create a flick at the end. You can create a harsh line instead of just a flick aswell such as the picture, above on the right.
Liquid or gel liner is much easier for creating a winged eyeliner look.
Tuesday, 11 October 2011
Haloween Vampire Eye Make-up
Hi
Today I'm going to share with you how to create this look vampire eye look:
 First prime your lids.
Then apply a dark purple eye shadow up to the crease then blend the colours at the edge to create a lighter colour.
Next in the crease apply a pinkish colour and again blend out.
Now line your eyes with either gel or liquid liner.
Line your bottom lashes with all the eyeshadow colours, and blend.
Now you've easily created this eye look.
Today I'm going to share with you how to create this look vampire eye look:

Then apply a dark purple eye shadow up to the crease then blend the colours at the edge to create a lighter colour.
Next in the crease apply a pinkish colour and again blend out.
Now line your eyes with either gel or liquid liner.
Line your bottom lashes with all the eyeshadow colours, and blend.
Now you've easily created this eye look.
Monday, 10 October 2011
Most Recommended Mac Products
Hi
Today I'm going to share with you the most (averagely) recommended mac products.
 1. MAC 217 blending brush. Given a average rating of 9.9/10.
All of the mac brushes are rated highly, all above 9/10. Though this was the highest rated one. Elle and Blair Fowler, online beauty gurus, say this is the perfect brush.
 2. MAC eyeshadows. Given a average rating of 9.4/10.
This rating is given to all the eyeshadows.
 3. MAC eyepencil. Given a average rating of 9.6/10.
Described as soft and creamy and never dry.
 4. MAC glitter. Given a average rating of 9.7/10.
This rating is given to all the glitter pots.
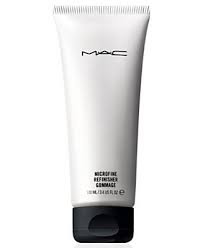
 5. MAC Microfine Refinisher. Given a average rating of 9.8/10.
Described as the next best thing to the professional.
Today I'm going to share with you the most (averagely) recommended mac products.
All of the mac brushes are rated highly, all above 9/10. Though this was the highest rated one. Elle and Blair Fowler, online beauty gurus, say this is the perfect brush.
This rating is given to all the eyeshadows.
Described as soft and creamy and never dry.
.jpg)
This rating is given to all the glitter pots.
Described as the next best thing to the professional.
Hope you enjoyed this!
Thursday, 6 October 2011
Naya Rivera's Eye Look
Hi
Today i'm going to share with you how to create this eye look.
 First prime your eyelid, preferably with Urban Decay primer potion.
Next line your upper eyelids with a pigmented liner, create quite a thick line.
Line the lower, outer half of your eyes with the same black liner.
Line the lower, inner half or your eyes with a pigmented white liner.
Apply fake eyelashes, I would recommend Eylure naturalite lashes intense (140).
Finally apply your favourite volumising mascara such as, (colossal cat eyes). This will blend your natural lashes in with the fake ones.
Today i'm going to share with you how to create this eye look.

Next line your upper eyelids with a pigmented liner, create quite a thick line.
Line the lower, outer half of your eyes with the same black liner.
Line the lower, inner half or your eyes with a pigmented white liner.
Apply fake eyelashes, I would recommend Eylure naturalite lashes intense (140).
Finally apply your favourite volumising mascara such as, (colossal cat eyes). This will blend your natural lashes in with the fake ones.
Wednesday, 5 October 2011
101 MAC Lipstick Finishes
Hi
Today I'm going to briefly explain to you the different finishes of MAC lipsticks.
AMPLIFIED CREME finish. These lipsticks are really soft and creamy, they have a major colour pay off (highly pigmented).
CREMESHEEN finish. These lipsticks are really moisturising and creamy and are highly pigmented.
Some Cremesheen lipsticks include: Lickable, Shy Girl and Speed Dial.
FROST finish. Full of shimmer with medium pigmentation.
Some Frost lipsticks include: Frenzy, Fluid nd Meltdown.
GLAZE finish. A very sheer pigment which is so sheer it could be mistaken for a gloss.
Some Glaze lipsticks include: Gleam, Hue and Frou.
LUSTRE finish. These lipsticks are quite sheer and give a wet gloss finish.
Some Lustre lipsticks include: Lovethorn, Lustering and Plink!
MATTE finish. Very pigmented colour, no shine or shimmer. Can be quite drying.
Some Matte lipsticks include: Russian Red, Please Me, Lady Danger
SATIN finish. Similar to the Matte finish, however they have a small amount of shine in them. They are more hydrating than Matte's.
Some Satin lipsticks include: Myth, Rebel and Brave.
Hope This Helps!
Today I'm going to briefly explain to you the different finishes of MAC lipsticks.
AMPLIFIED CREME finish. These lipsticks are really soft and creamy, they have a major colour pay off (highly pigmented).
Some Amplified Creme lipsticks include: Saint Germain, Vegas Volt and Craving.
CREMESHEEN finish. These lipsticks are really moisturising and creamy and are highly pigmented.
Some Cremesheen lipsticks include: Lickable, Shy Girl and Speed Dial.
FROST finish. Full of shimmer with medium pigmentation.
Some Frost lipsticks include: Frenzy, Fluid nd Meltdown.
GLAZE finish. A very sheer pigment which is so sheer it could be mistaken for a gloss.
Some Glaze lipsticks include: Gleam, Hue and Frou.
LUSTRE finish. These lipsticks are quite sheer and give a wet gloss finish.
Some Lustre lipsticks include: Lovethorn, Lustering and Plink!
MATTE finish. Very pigmented colour, no shine or shimmer. Can be quite drying.
Some Matte lipsticks include: Russian Red, Please Me, Lady Danger
SATIN finish. Similar to the Matte finish, however they have a small amount of shine in them. They are more hydrating than Matte's.
Some Satin lipsticks include: Myth, Rebel and Brave.
Hope This Helps!
Tuesday, 4 October 2011
The Perfect Pink Pout!
Hi
Today I'm going to share with you, how to create a perfect pink pout.
 First apply either a lip balm or lip primer, to smooth our your lips and also prime them.
Next apply a pigmented hot pink lipstick such as: MAC's Lickable.
Now apply a clear gloss on top of the lipstick,make sure you apply a lot so it truly gets the glossy finish. However Lickable is a Cremesheen lipstick so it does have a slight gloss finish.
 Now Your Done
Today I'm going to share with you, how to create a perfect pink pout.

Next apply a pigmented hot pink lipstick such as: MAC's Lickable.
Now apply a clear gloss on top of the lipstick,make sure you apply a lot so it truly gets the glossy finish. However Lickable is a Cremesheen lipstick so it does have a slight gloss finish.
Saturday, 1 October 2011
September Favourites!
Hi
Today I'm going to do my quick monthly favourites post.
First is the Wet & Wild waterproof mascara. This is great for school or work as obviously its waterproof and avoids running down your face!
Natural Collection Juicy Lips lipgloss in Foundant, a really nice creamy lip gloss that has good pigmentation.
Loreal Paris Infallible Brush Foundation. I love this, as it lasts really long definately all day and still remains to cover redness and blemishes.
Really Quick Favourites!
1000 PAGEVIEWS!!!!!!!!!!!!!

Subscribe to:
Posts (Atom)